Sheppussaco Part 1
Apologies for my absence, I have been furiously working on my 3rd wargaming weekend,
The Battle of Sheppussaco.
The previous 2 battles have been Sheppavera and Sheppamanca. The French won Sheppavera and the British won Sheppamanca.
These battles were based on but not exactly the same as the battles of Talavera, Salamanca and Bussaco. The battlefields were similar but not the same.
I used the Orders of Battle of the actual battle and decided to give each side very similar numbers and very similar terrain. This way, there is no advantage to either side as there was at Bussaco.
I also decided to have the game under my pergola at the back of the house as the forecast was for a very nice day.
This first post will cover some of the terrain that I made for the battle.
I made some hills to make a few ridges for Sheppamanca last year, but, I made them a little too steep and a lot of the soldiers fell over. My soldiers are mainly plastic, which I have added weights to the base. These figures didn't fall over on my ridges, but with the weight of the metal figures more evenly spread, there was a bit of frustration among the participants.
I therefore decided to fix this problem by re-shaping my hills. I covered all of my hills in a cheap Liquid Nails, that I bought from Bunnings (a tools and home hardware warehouse). This had to be removed before I could fix the angle.
My wife and I had new wardrobe doors installed, which I was going to get rid of. She then suggested that I should utilise them.......how and why didn't I think of that.......I will never know.
I decided to use the height of the door as the height of the hill.
I used my Hot Wire Foam Cutter to cut the polystyrene. You can also see that I had decided to cut my hills into sections. I thought that 20 cm (8 inches) would be a nice width for these sections.
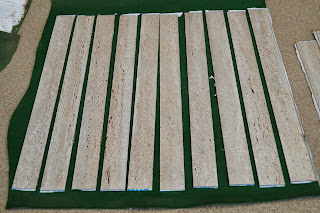
I was walking through Bunnings, looking for some cork tiles for making some roads when I made one of those "Eureka" moments. On the shelf above the cork tiles I saw these sections of adhesive Lino squares.
They were only $4 something each and the pattern screamed out "Spanish Roads". Don't you think?
I thought that a 4 cm strip should be adequate so set about using a Stanley Knife to cut the tile.
After cutting up 1 full tile into straight roads, I cut some crossroad, bends and y-sections. After half cutting the tiles I found it very easy to finish the cut with a pair of scissors.
After cutting the sections I was thinking of removing the adhesive by wiping with Mineral Turps, but decided to use the adhesive qualities and attached the sections to some acrylic felt. I was very pleased with the result
Another "Problem" that had occurred in the Battle of Sheppamanca was the "Line of Sight" on a hill. I have not played with many rule sets but I imagine it is a problem in many of those sets.
I decided to take the argument out of the equation by cutting my hills into sections too.
By cutting the end sections, which have no crest, and cutting the rest in half, you have definitive "Lines of Sight" which cannot be argued over.
My next job was to cover the polystyrene to protect the sections. This was once again done by a cheap Liquid Nails called Maxi Nails by Parfix.
I sprinkled some sand on the wet Maxi Nails. This will give both a bit of traction and the "look" of grass
It will also protect the cut areas
I painted them all with Dulux "Royal Hunter Green" as I have some heavy duty material which is dark green
The hill sections came together quite well
As did the other hill sections
I attempted to airbrush some different colours of greens and browns but I hadn't cleaned my airbrush properly, which wouldn't allow me to achieve the finish that I wanted
I drybrushed these colours on with a small house paintbrush.
I had another "Eureka" moment. I would make the hills either Very Steep Hills or Rocky Terrain.
Very Steep Hills meant that movement was cut by 4 inches and Rocky Terrain cut movement in half.
Each of these incurs 2 disorders to each unit moving up these hills. The closet door will become a plateau, giving the units a chance to remove their disorders before ascending the "Normal" hills to reach their objective "The Village of Sheppussaco".
In Part 2, I will give the first part of battle report. Stay tuned


Looking good there, Paul! Those roads look the part.
ReplyDeleteSorry I couldn't make it, but from Darren's photo's a good weekend's gaming was had by all. Look forward to the write up!
We are doing the Battle of Goulboa next year, based loosely on the Battle of River Coa. Have you seen Robin's pics?
ReplyDelete